


 русский
 Français
 日本語
日本語 Latine
 한국어
한국어 Tiếng Việt
 ไทย
ไทย বাংলা
বাংলা عربى
عربى Hrvatski
 čeština
 dansk
dansk Nederlands
 Pilipino
 Suomalainen
 Deutsch
 Magyar
 Indonesia
 italiano
 Gaeilge
 Bahasa Melayu
 فارسی
فارسی norsk
norsk Polskie
 Português
 Română
 Español
 Slovák
 svenska
 Türk
TürkLær om vores brancheudstillingsinformation og seneste begivenheder i vores virksomhed.
• CNC knivslibemaskinen anvender PLC-programstyring, som er nem at betjene, hurtig, stabil, pålid...
See DetailsThe basic process for using a straight knife grinding machine follows a structured sequence: machine preparation and inspection, blade mounting and fixture setup, grinding parameter configuration, the grinding pass itself, inspection of the ground edge, and finishing or cleaning. Executing each step correctly is essential to achieving a sharp, geometrically accurate edge without damaging the blade or the machine. The sections below walk through every stage in practical detail, with guidance on common settings, safety requirements, and quality checkpoints.
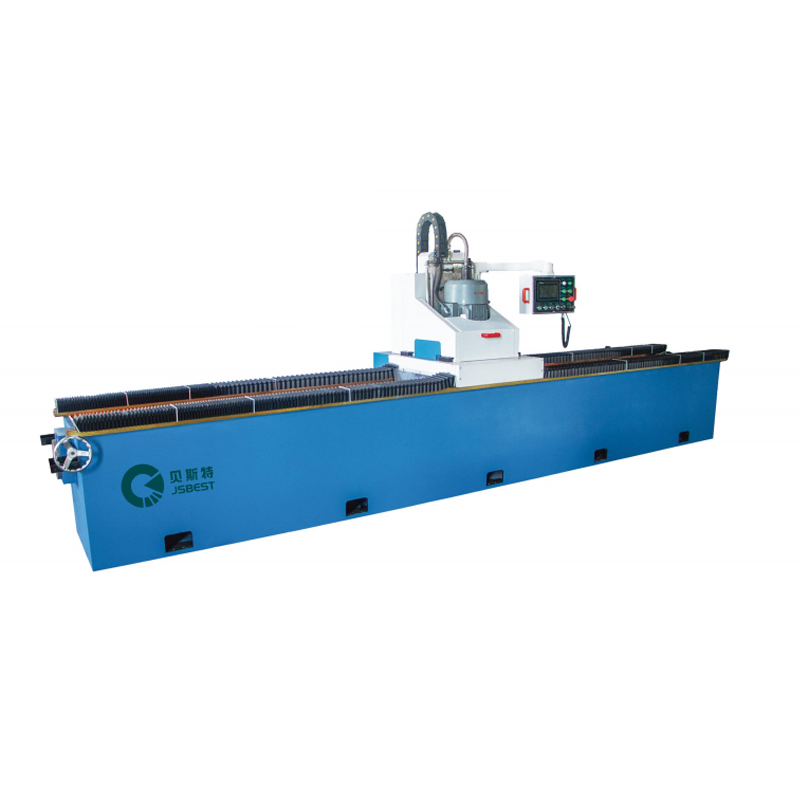
A straight knife grinding machine is a precision grinding system designed specifically for long, straight-edged blades and workpieces — the kind used in papermaking, printing, woodworking, textiles, food processing, and plastics cutting. Unlike bench grinders or universal tool grinders, a straight knife grinder incorporates a dedicated worktable and fixture system engineered to hold a long blade flat and rigid throughout the full length of the grinding pass. This eliminates the rocking, lateral drift, and uneven pressure that would otherwise produce inconsistent edge geometry.
The MDD Series Straight Knife Grinding Machine, for example, uses high-quality abrasive wheels and advanced grinding technology to ensure a large, consistent contact area between the wheel and the blade surface. This maximizes material removal per pass, improves surface finish uniformity, and — because heat is distributed across a wider area — reduces the risk of localized overheating that could alter the blade's temper or cause warping. Understanding how the machine achieves this helps the operator make better setup and parameter decisions at each stage of the process.
Before a blade is placed on the machine, a thorough pre-operation check protects both the operator and the workpiece. Skipping this stage is a leading cause of poor grinding results and equipment damage.
The grinding wheel is the most safety-critical component on the machine. Before starting, visually inspect the wheel for cracks, chips, or uneven wear. A cracked wheel can disintegrate at operating speed, creating a serious hazard. Never operate a wheel that shows any visible crack, however small. Check that the wheel is correctly mounted — properly flanged, with the blotter (paper gasket) in place, and the retaining nut torqued to the manufacturer's specification. If the wheel has not been used recently, allow it to run at operating speed for at least one minute with no workpiece contact before beginning to grind.
Verify that the coolant reservoir is filled to the correct level and that the coolant nozzle is properly aimed at the wheel-blade contact zone. Coolant serves two purposes: it reduces grinding temperature to protect the blade's heat treatment, and it flushes swarf (metallic grinding debris) away from the contact zone to prevent re-cutting and surface scratching. Confirm that the coolant pump operates correctly and that there are no blocked lines or leaking connections.
Wipe the worktable surface and any magnetic chuck surfaces clean with a lint-free cloth. Even small chips or particles on the table surface will cause the blade to sit unevenly, introducing a tilt error into the ground bevel. Check that the table slides freely along its full travel range and that the table locking mechanism functions correctly.
Before mounting the blade, assess its current condition to determine how the grinding session should be approached.
Correct blade mounting is the single most important factor in edge quality. An improperly secured blade will vibrate during grinding, producing a wavy or irregular edge, and in severe cases the blade may shift or eject from the fixture.
Place the blade flat on the worktable with the edge to be ground facing the wheel. Align the back of the blade against the table's reference fence or stop to ensure it sits square to the direction of table travel. On machines equipped with a magnetic chuck, activate the magnetic hold — this provides a large, even clamping force across the blade's full length without the stress concentrations that mechanical clamps can introduce.
For blades too thin for reliable magnetic holding, or for non-ferrous blades that the magnetic chuck cannot hold, use the machine's mechanical fixture system. Apply clamps at regular intervals along the blade length — typically every 200–300 mm for blades longer than 600 mm. Tighten clamps evenly to avoid introducing lateral bow into the blade. The worktable and fixture system of the MDD Series is specifically designed to keep long blades and workpieces stable throughout the grinding pass, eliminating shake or positional deviation that would compromise edge geometry.
Most straight knife grinding machines allow the worktable or grinding head to be tilted to set the required bevel angle. Common bevel angles for industrial straight knives range from 15° to 35°, depending on application: lower angles (15°–20°) for fine cutting of paper and films, steeper angles (25°–35°) for woodworking and heavier materials. Set the angle using the machine's graduated scale and lock it firmly before proceeding. Verify the set angle against the blade's original specification or the manufacturer's recommended angle for the intended application.
Setting the correct grinding parameters before the first cut determines both the efficiency of the process and the quality of the result. The main variables to configure are wheel speed, table traverse speed, depth of cut per pass, and coolant flow rate.
| Parameter | Typical Range | Effect of Setting Too High | Effect of Setting Too Low |
|---|---|---|---|
| Grinding wheel speed | 1,400–2,800 rpm (varies by wheel dia.) | Overheating, wheel breakage risk | Poor surface finish, wheel loading |
| Table traverse speed | 2–15 m/min | Chatter marks, uneven removal | Excessive heat, glazed wheel |
| Depth of cut per pass | 0.01–0.05 mm (roughing); 0.005–0.01 mm (finishing) | Burning, blade warping | Excessive passes needed, inefficiency |
| Coolant flow rate | 5–20 L/min depending on wheel size | Splash, wheel imbalance if excessive | Overheating, poor swarf evacuation |
As a general rule, use heavier depth of cut and faster traverse speed for roughing passes (removing damage or restoring a grossly worn bevel), then reduce both for finishing passes. The final one or two passes should use a depth of cut of no more than 0.005–0.01 mm to produce a fine, consistent edge without risking heat damage.
With the blade secured, the angle set, and the parameters configured, the grinding operation can begin. The sequence is as follows:
Throughout the grinding operation, monitor blade temperature by touch at the non-ground end between passes. If the blade feels more than warm to the touch, allow additional cooling time between passes or increase coolant flow. Blade discoloration (blue or brown straw colors on the bevel face) indicates that the steel has been overheated and the heat treatment may have been altered — if this occurs, stop and reassess parameters.
Grinding wheel dressing is an often-overlooked but essential part of the straight knife grinding process. As the wheel grinds, its cutting surface becomes loaded with metallic particles and its abrasive grains become dulled and glazed. A glazed wheel loses cutting ability, generates more heat, and produces a poorer surface finish.
Dress the wheel using the machine's built-in dressing unit — typically a diamond dresser mounted on a traversing slide. The dressing process removes a thin layer from the wheel surface, exposing fresh, sharp abrasive grains and restoring the wheel's true cylindrical form. Dress the wheel before beginning a grinding session, whenever the wheel appears glazed or surface finish degrades, and after any wheel truing following a crash or damage. A typical dressing pass removes 0.01–0.02 mm from the wheel diameter and traverses the diamond across the wheel face at 100–300 mm/min.
After grinding is complete, the blade must be inspected before it is returned to service or declared finished. A systematic inspection covers the following:
The simplest functional sharpness test is the paper-slice test: hold a strip of paper vertically and draw the blade edge across it. A sharp blade slices cleanly with minimal resistance; a dull or damaged blade tears or catches. For higher precision, optical edge inspection with a loupe (10×–20× magnification) can reveal micro-chipping, wire edge formation, or surface scratches that the paper test may not detect.
Use a bevel angle gauge or digital protractor to confirm that the ground bevel matches the specified angle. Even a 1°–2° deviation from the target angle can affect cutting performance and blade life in precision applications. If the measured angle deviates from specification, adjust the table tilt setting and take a corrective pass before final acceptance.
Lay the blade flat on a surface plate and use a dial indicator or feeler gauge to check for any bow or twist introduced during grinding. For blades used in precision cutting applications, straightness tolerance is typically 0.05 mm or better over the full blade length. A blade that has warped during grinding must be re-evaluated — grinding-induced warping is usually caused by overheating and is a sign that parameters need adjustment.
Examine the bevel face under raking light or with a surface finish comparator. The ground surface should show consistent, parallel grinding marks across its full length, with no cross-hatching, irregular patches, or burn marks. A surface roughness (Ra) of 0.4–0.8 µm is typical for a correctly executed finish pass on a straight knife grinding machine.
Grinding always produces a wire edge (also called a burr) — a thin sliver of metal that folds over the edge apex on the side opposite the ground bevel. This wire edge must be removed before the blade can perform correctly.
For most industrial straight knives, the wire edge is removed by light honing with a fine-grit honing stone or ceramic rod drawn along the flat face of the blade at a very shallow angle (5°–10°). Use two to three light strokes, alternating sides, to fold the wire edge back and forth until it breaks off cleanly. For blades with a very fine edge specification, strop lightly on a leather strop after honing. Do not apply heavy pressure during deburring — the goal is to remove the wire edge without altering the carefully ground bevel angle or rounding the edge apex.
After grinding and inspection, the blade must be cleaned and protected before storage or reinstallation. Residual coolant on the blade surface will cause rapid oxidation if not removed, particularly on carbon steel blades.
After the blade is removed, clean the machine worktable and fixture surfaces, flush the coolant system if the machine will be idle for an extended period, and cover the grinding wheel to protect it from contamination.
Even experienced operators encounter grinding problems. Understanding the cause of each issue allows rapid diagnosis and correction.
| Problem | Likely Cause | Corrective Action |
|---|---|---|
| Uneven edge along blade length | Blade not clamped flat; blade bowed | Re-clamp; check and correct blade bow before grinding |
| Blue discoloration on bevel face | Overheating; insufficient coolant; depth of cut too heavy | Reduce depth of cut; increase coolant flow; check for glazed wheel |
| Chatter marks on ground surface | Traverse speed too high; wheel imbalance; loose fixture | Reduce traverse speed; balance or dress wheel; check clamp tightness |
| Wheel loading (wheel face smeared) | Wheel too fine or too hard for blade material; insufficient coolant | Dress wheel; switch to a coarser or softer grade wheel |
| Edge chipping after grinding | Bevel angle too acute; blade steel embrittled by overheating | Increase bevel angle; check for heat damage and re-temper if needed |
| Inconsistent surface finish across width | Wheel not dressed true; table tilt incorrect | Dress wheel; re-verify and reset table tilt angle |
Grinding operations involve high-speed rotating abrasives, sharp-edged workpieces, and airborne metallic particles. Adhering to safe operating practices protects the operator and ensures consistent results.
The quality of a straight knife grinding process is directly shaped by the machine's design and manufacturing pedigree. The MDD Series Straight Knife Grinding Machine is built to handle the full range of long industrial straight blades — including those used in papermaking, printing, woodworking, textiles, food, forestry, and plastics industries. Its key design features include a purpose-built worktable and fixture system that maintains blade stability along the complete length of the grinding pass, advanced abrasive grinding technology that provides a large wheel-to-blade contact area for high efficiency, and an effective thermal management system that controls heat generation to protect blade metallurgy.
Jiangsu Best CNC Machinery Co., Ltd., the manufacturer behind the MDD Series, brings over 35 years of specialization in sharpening machine manufacturing to this product line. Operating as China's largest professional sharpening machine production base, the company is responsible for drafting national standards for sharpening machines in China — a responsibility that reflects the technical depth and industry standing of its engineering team. The company holds ISO 9001 quality system certification and CE certification, and its products carry export licenses for international markets. Its in-house capabilities span research and development, precision machining, testing, assembly, and equipment installation and commissioning — ensuring that every machine delivers the performance and repeatability that industrial blade grinding demands.
The complete straight knife grinding process can be summarized as a nine-step sequence, each building on the last to ensure a safe, efficient, and high-quality result:
Following this process consistently — with attention to each setup detail and quality checkpoint — allows operators to achieve repeatable, high-precision edge results across a wide range of blade types and industrial applications, while protecting both the blade's service life and the integrity of the grinding machine itself.
• CNC knivslibemaskinen anvender PLC-programstyring, som er nem at betjene, hurtig, stabil, pålid...
See Details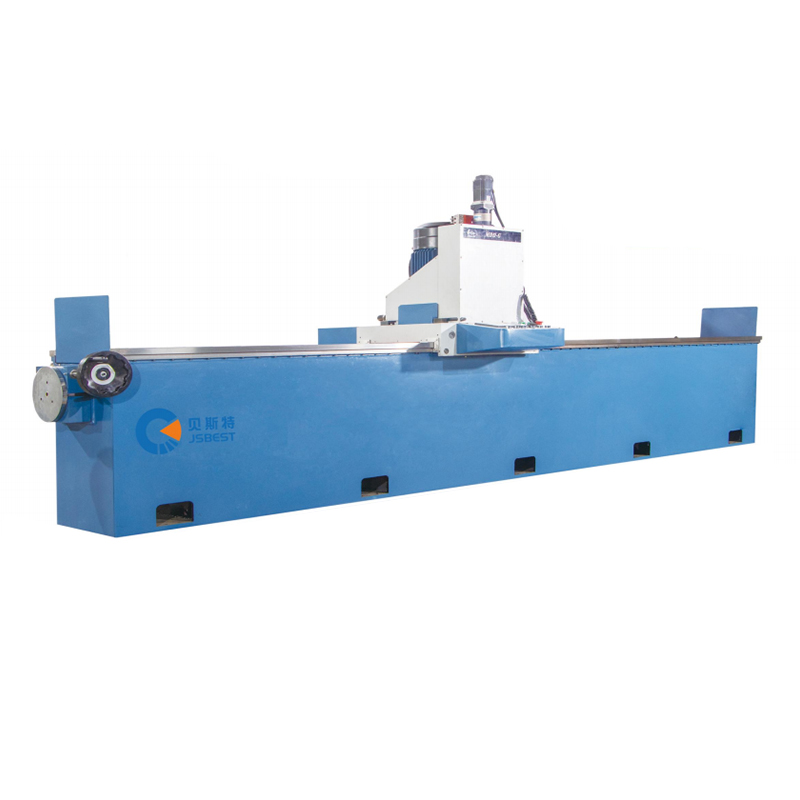
• Hele maskinen anvender en svejsestruktur af høj styrke gantry-typen, med en solid og kompakt ov...
See Details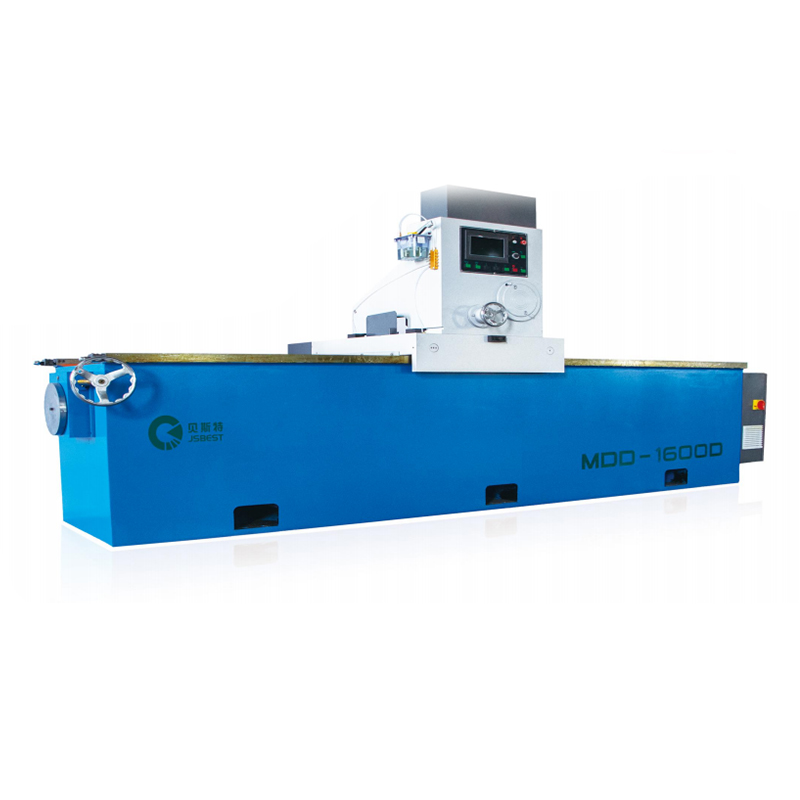
• Slibemaskinen anvender en portal-type leje, højkvalitets stålpladesvejsning, højtemperaturhærdn...
See Details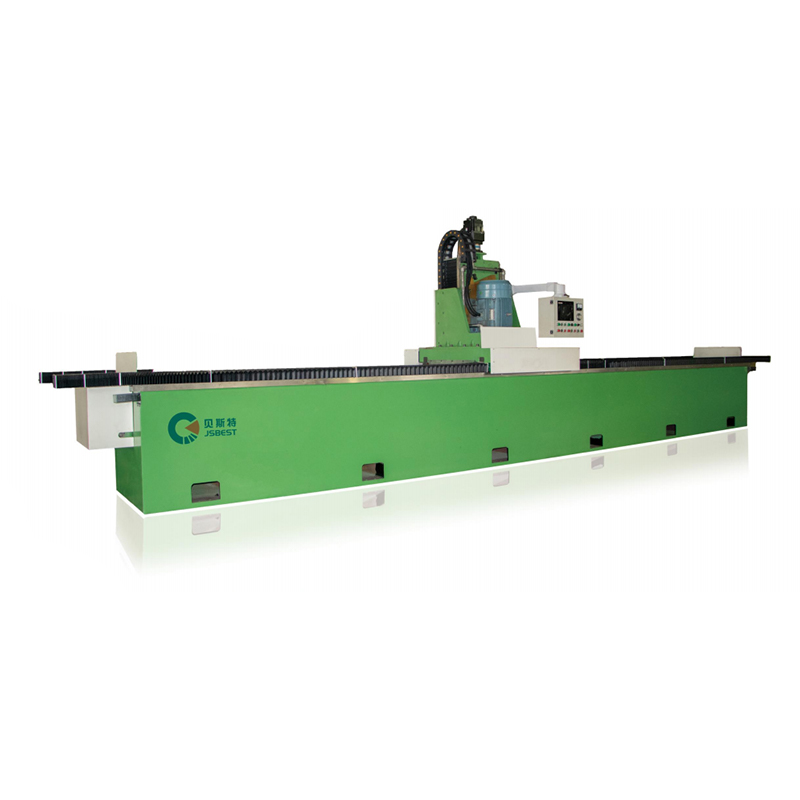
• En højstyrke svejset stålstruktur er vedtaget for at eliminere den indre belastning af m...
See Details
Double-Head Knife Grinding Machine er et effektivt slibeudstyr, der kombinerer grovslibning og fi...
See Details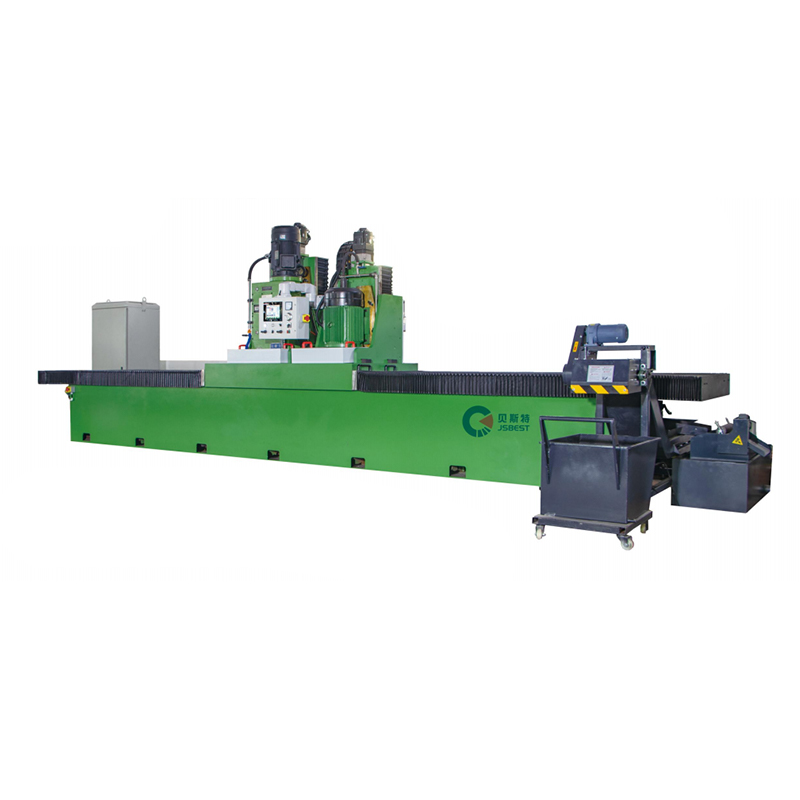
Heavy-Duty overfladefræse- og slibemaskine er et effektivt forarbejdningsudstyr, der integrerer f...
See Details
• Denne runde knivsliber anvender et PLC-program til at styre den automatiske fodringsdel, som er...
See Details
CNC cirkulær knivslibemaskine strukturelle funktioner: • Høj slibenøjagtighed, spindel- og kni...
See DetailsLær om vores brancheudstillingsinformation og seneste begivenheder i vores virksomhed.


